
Mastering RemoteIoT VPC SSH Windows 10 Without Third-Party Tools
Hey there, tech enthusiasts! If you're reading this, chances are you're diving headfirst into the world of remote access and secure connections. Welcome to the realm of RemoteIoT VPC SSH on Windows 10 without third-party tools. Yep, you heard that right—no extra bloatware needed. Today, we’re going to explore how you can set up a secure, seamless connection for your IoT devices using SSH right from your Windows 10 machine. So buckle up, because we’re about to dive deep into some serious tech wizardry!
Imagine this: You're managing a network of IoT devices scattered across different locations, and you need a way to access them securely without exposing your system to unnecessary risks. That's where RemoteIoT VPC SSH comes in. This setup allows you to create a virtual private cloud (VPC) environment that’s as secure as it gets. With Windows 10's built-in capabilities, you can achieve all this without relying on third-party software. Pretty cool, huh?
Now, before we jump into the nitty-gritty details, let’s set the stage. This article isn’t just another tech guide—it’s a comprehensive walkthrough designed to empower you with the knowledge and skills to master remote access for your IoT devices. We’ll cover everything from setting up SSH on Windows 10 to configuring your VPC environment, all while ensuring your data remains safe and sound. Let’s get started!
- Kannada Movies Online Watch The Latest Best 20222025
- Andraya Carters Wife The Untold Story Of Bre Austin
Understanding the Basics of RemoteIoT VPC SSH
Before we dive into the setup process, it’s essential to understand what RemoteIoT VPC SSH actually means. Think of it as a secure tunnel that connects your local machine to your IoT devices through a virtual private cloud. This setup ensures that your data is transmitted securely, protecting it from prying eyes. SSH, or Secure Shell, is the protocol that makes this possible, allowing you to remotely manage your devices with ease.
Now, here’s the kicker: Windows 10 comes equipped with native SSH capabilities, which means you don’t need to install any additional software. By leveraging these built-in features, you can create a robust and secure connection to your IoT devices without compromising your system’s integrity.
Why Use RemoteIoT VPC SSH?
- Security: SSH encrypts all data transmitted between your local machine and IoT devices, ensuring that sensitive information remains protected.
- Flexibility: With a VPC environment, you can manage multiple IoT devices from a single point of access, streamlining your workflow.
- Cost-Effective: By avoiding third-party tools, you save both time and money while still achieving professional-grade results.
Setting Up SSH on Windows 10
Alright, let’s get our hands dirty. The first step in mastering RemoteIoT VPC SSH is setting up SSH on your Windows 10 machine. Don’t worry—it’s easier than it sounds. Here’s a step-by-step guide to get you started:
- Movierulz Kannada 2024 Watch Kannada Movies Safely Legally
- Subhashree Sahu Mms Leak Whats The Truth Scandal Update
First things first, you need to enable the OpenSSH Client and Server features on your Windows 10 system. Head over to the Settings app, navigate to Apps > Optional Features, and click on "Add a feature." From there, search for "OpenSSH Client" and "OpenSSH Server," and install both. Once installed, restart your machine to ensure everything is up and running smoothly.
Configuring SSH for Remote Access
Now that SSH is installed, it’s time to configure it for remote access. Open the Command Prompt or PowerShell as an administrator and run the following commands:
For the SSH Server:
- Start the service:
Start-Service sshd - Set it to start automatically:
Set-Service -Name sshd -StartupType 'Automatic'
For the SSH Client:
- Verify installation:
ssh -V
With these steps, you’ve successfully set up SSH on your Windows 10 machine. Next, let’s move on to configuring your VPC environment.
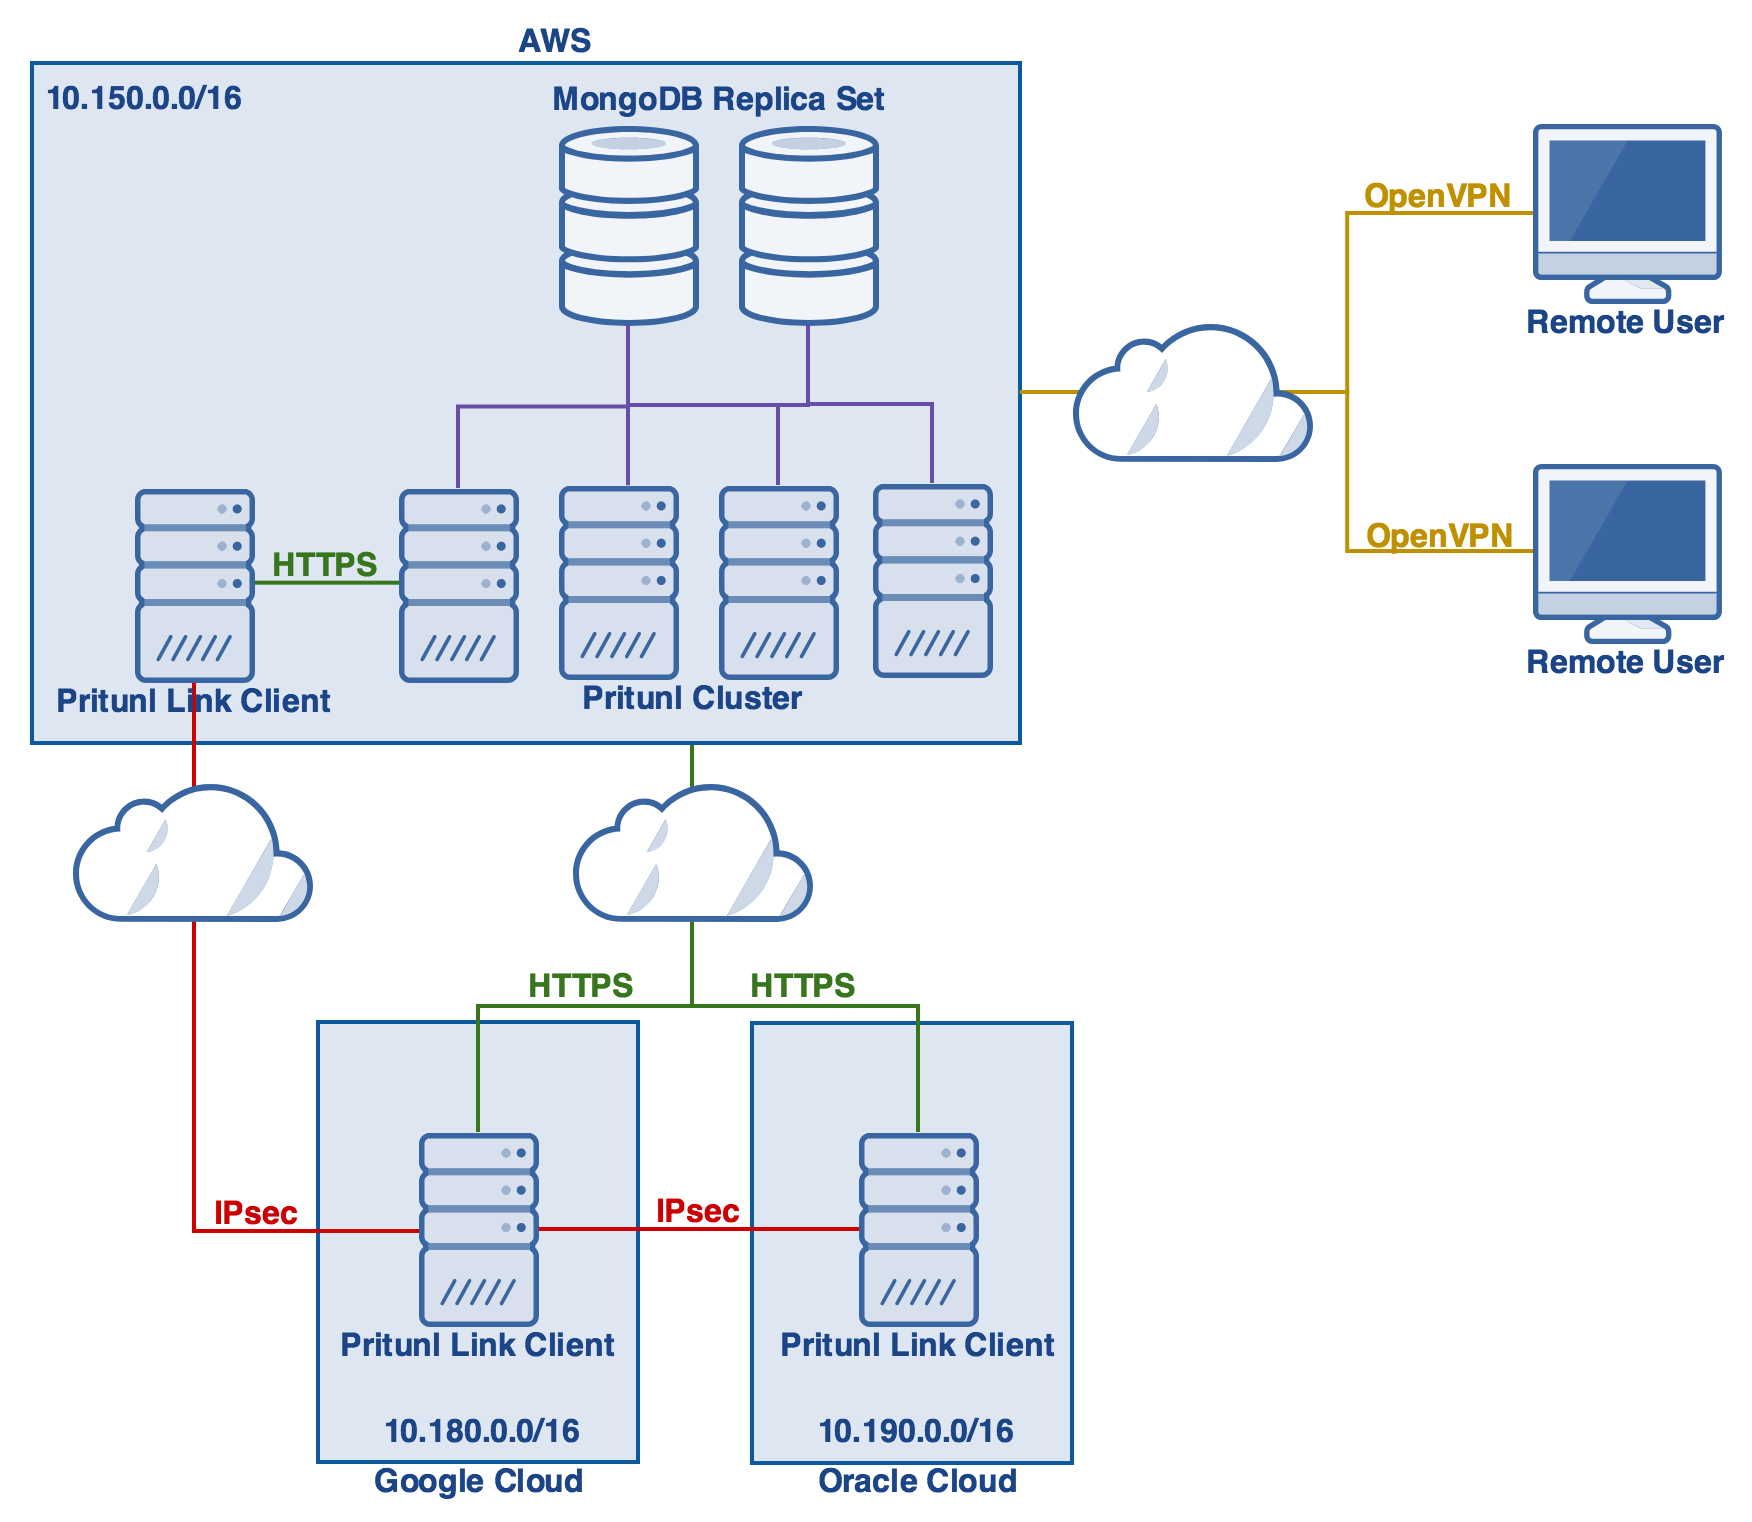
Creating a Virtual Private Cloud (VPC)
A VPC acts as a secure container for your IoT devices, isolating them from the rest of the internet. This setup is crucial for maintaining the integrity of your network and ensuring that only authorized connections can access your devices.
To create a VPC, you’ll need to use a cloud provider like AWS, Azure, or Google Cloud. For this example, we’ll focus on AWS. Log in to your AWS account, navigate to the VPC dashboard, and create a new VPC. Make sure to configure the necessary subnets, route tables, and security groups to allow SSH access from your Windows 10 machine.
Connecting Your IoT Devices to the VPC
Once your VPC is up and running, it’s time to connect your IoT devices. This process involves assigning private IP addresses to your devices and configuring them to communicate within the VPC environment. Depending on the type of IoT devices you’re using, this step may vary slightly. However, the general principle remains the same: ensure that all devices are part of the same VPC subnet and can communicate securely through SSH.
Securing Your RemoteIoT VPC SSH Connection
Security should always be your top priority when setting up remote access for your IoT devices. Here are a few tips to help you fortify your RemoteIoT VPC SSH connection:
- Use Strong Passwords: Ensure that all SSH accounts have strong, unique passwords to prevent unauthorized access.
- Enable Key-Based Authentication: Replace password authentication with SSH keys for an added layer of security.
- Limit Access: Restrict SSH access to specific IP addresses or ranges to minimize the risk of unauthorized connections.
Monitoring and Logging
Regularly monitoring your SSH connections and logging activity is essential for maintaining the security of your network. Most cloud providers offer built-in tools for monitoring and logging, so take advantage of these features to keep an eye on your VPC environment.
Best Practices for RemoteIoT VPC SSH
Now that you’ve set up your RemoteIoT VPC SSH connection, it’s time to establish some best practices to ensure smooth and secure operations. Here are a few tips to keep in mind:
- Regular Updates: Keep your Windows 10 machine and IoT devices up to date with the latest security patches and updates.
- Backup Data: Regularly back up important data to prevent data loss in case of unforeseen events.
- Test Connections: Periodically test your SSH connections to ensure everything is functioning as expected.
Troubleshooting Common Issues
Even with the best setup, issues can arise. Here are a few common problems and their solutions:
- Connection Refused: Check your firewall settings and ensure that SSH is allowed through the necessary ports.
- Authentication Failed: Verify that your SSH keys or passwords are correct and that the user account exists on the remote device.
- Timeout Errors: Increase the timeout settings in your SSH client or check your network connectivity.
Exploring Advanced Features
Once you’ve mastered the basics of RemoteIoT VPC SSH, you can start exploring more advanced features. For example, you can set up automated scripts to manage your IoT devices, implement load balancing for better performance, or integrate with other cloud services for enhanced functionality.
Automation with Scripts
Using SSH, you can automate repetitive tasks by writing scripts that execute commands on your IoT devices. This not only saves time but also reduces the risk of human error. Popular scripting languages like Python and Bash can be used to create powerful automation tools for your VPC environment.
Real-World Applications of RemoteIoT VPC SSH
So, how can you apply RemoteIoT VPC SSH in real-world scenarios? Here are a few examples:
- Smart Home Management: Use SSH to remotely manage and monitor smart home devices, ensuring they’re always functioning optimally.
- Industrial IoT: Securely access and control industrial IoT devices from a central location, streamlining operations and reducing downtime.
- Remote Monitoring: Monitor environmental sensors and other IoT devices in remote locations, providing real-time data for decision-making.
Case Studies
Take a look at some successful implementations of RemoteIoT VPC SSH in various industries. These case studies highlight the benefits of using SSH for secure remote access and demonstrate its versatility across different applications.
Conclusion and Next Steps
And there you have it—a comprehensive guide to mastering RemoteIoT VPC SSH on Windows 10 without third-party tools. By following the steps outlined in this article, you can set up a secure, efficient remote access system for your IoT devices, ensuring that your data remains safe and your operations run smoothly.
Now it’s your turn to take action! Start by setting up SSH on your Windows 10 machine and configuring your VPC environment. Experiment with different features and settings to find what works best for your specific needs. And don’t forget to share your experiences and insights in the comments below. Your feedback helps us improve and provides valuable information for other readers.
Table of Contents
Article Recommendations
- Latest Telugu Movies Movierulz Alternatives Watch Now
- Alana Cho Leaks The Full Story What It Means For You

Detail Author:
- Name : Ryleigh Lindgren V
- Username : rwintheiser
- Email : xgusikowski@bogan.biz
- Birthdate : 1993-12-18
- Address : 742 Blick Extensions Suite 658 North Adellaburgh, CA 48245-5402
- Phone : (954) 737-3251
- Company : Schulist-Harber
- Job : Telephone Operator
- Bio : Consectetur repudiandae placeat impedit provident est. Nam tempora velit quis quod temporibus. Commodi sequi laborum perferendis iste sed nemo quia.
Socials
linkedin:
- url : https://linkedin.com/in/kendra_dev
- username : kendra_dev
- bio : Quis minus rem rem.
- followers : 5075
- following : 289
instagram:
- url : https://instagram.com/kendra_dev
- username : kendra_dev
- bio : Qui est saepe ex. Et atque voluptate blanditiis et eum amet. Sed repudiandae aut ipsam quia.
- followers : 273
- following : 2043
tiktok:
- url : https://tiktok.com/@kendra9712
- username : kendra9712
- bio : Dolorem delectus quis voluptatem qui inventore natus.
- followers : 5712
- following : 1586
twitter:
- url : https://twitter.com/kendra_id
- username : kendra_id
- bio : Ipsam error quia magnam voluptas in atque. Laudantium est ad cupiditate provident quam.
- followers : 2236
- following : 121
